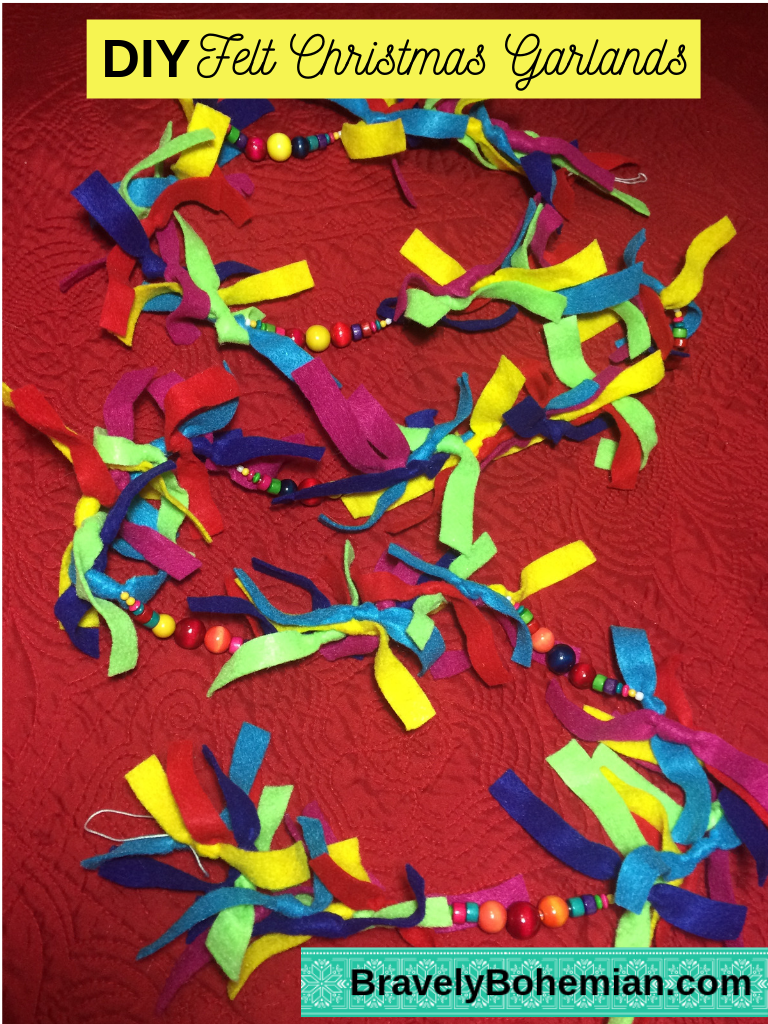
Bravely Bohemian

Breathe Deep, Be Brave

  • Fashion
    • Trends
    • Wedding
    • Steampunk
  • Adventuring
    • History
  • DIY
    • Home Decorating
    • Crafting
    • Cooking
  • Spirit
  • Wellness
    • Pets
  • Reviews
    • Books
    • Media
    • Products
  • Shop
    • Gift Guides
  • About
  • Join Us!
  • Contact Us!

Apple Oatmeal Cookies Using Fresh New York State Apples

November 15, 2018 by BravelyBohemian

Apple Oatmeal Cookies make a great lunchbox treat or midday snack, especially in the Fall.

Apple Oatmeal Cookies_New York State Apples

Apple season is a BIG deal here in Upstate New York. Some of the best apple varieties in the U.S. were developed here in New York State- MacIntosh, Empire, Crispin, Cortland, Macoun, IdaRed, and many more.

I was fortunate to grow up playing in my Dad’s organic apple orchard that still produces fantastic apples every year. The 300-tree orchard has been my father’s hobby for over 30 years. My bohemian spirit soars when I walk through the orchard. You can feel the love my Dad has poured into those trees and the land over the years.

I still enjoy spending an afternoon wandering around the orchard. Like connoisseur wine tasting, my dad takes guests row by row to taste each apple variety and make sure the apples are at peak flavor for picking. Surrounded by the abundance of apples and beautiful Fall leaves, you can’t help but feel happy and relaxed.

I love to make Apple Oatmeal Cookies with the freshly picked apples from the orchard. This recipe is super easy. Select flavorful apples. The New York State Apple Growers have a great guide to help you. I used Crispins. These cookies also gain more flavor after a day or two thanks to so much cinnamon.

Apple Oatmeal Cookies_New York State Apples

Apple Oatmeal Cookies

¾ cup brown sugar
½ cup margarine
2 eggs
1 tsp vanilla
2 cups old-fashioned oats
2- 3 tsp of cinnamon (to taste)
½ tsp salt
½ cup chopped walnuts
1 cup flour
½ tsp baking soda
2 apples, peeled and diced

1. Prepare the apples and walnuts, then set aside.

2. Beat together the brown sugar and margarine until fluffy, then beat in the eggs and vanilla.

3. Combine all of the dry ingredients and carefully mix into the wet ingredients.

4. Stir in the apples and walnuts.

5. Drop cookies by the spoonful onto ungreased baking sheets.

6. Bake at 375 degrees for 9 to 12 minutes. Cookies will turn lightly brown and harden slightly as they cool.

This recipe makes approximately 2 ½ dozen Apple Oatmeal Cookies.

Happy boho baking! Looking for more bohemian kitchen approved apple recipes? Click here!

Apple Oatmeal Cookies_New York State Apples

Share this:

  • Click to share on Facebook (Opens in new window)
  • Click to share on Twitter (Opens in new window)
  • Click to share on Pinterest (Opens in new window)
  • Click to share on LinkedIn (Opens in new window)

Filed Under: Cooking, DIY Tagged With: Baking, Christmas, Cooking, DIY, Fall, Holidays

Apple Spice Bar Cookies or Apple Spice Cake

November 15, 2018 by BravelyBohemian

If you are looking for a flavorful Fall or Holiday apple recipe, try these yummy Apple Spice Bar Cookies (or Apple Spice Cake). The Apple Spice cookies have lots of cinnamon and nutmeg in them, plus molasses. They have an almost gingerbread flavor and are delicious with a cup of tea or mulled cider on a chilly Fall day.

Apple Spice Bar Cookies Recipe

These cookies are cake-soft. Bake them in a 9×12 pan if you prefer a cake or a 10×15 if you prefer bar cookies.

I grew up in 4-H, where I learned many life skills, including baking. One of the projects I entered in the County Fair was an apple recipe collection. New York State is known for many fantastic apple varieties. We had to pick a main ingredient and then make at least ten recipes using that ingredient. We then had to write a review, as well as try and make the recipes as healthy as possible. I think I was about 12 at the time. Check out that snazzy handwriting! I don’t know what happened to the rest of the cookbook, but as you can see, I did happen to save the original Apple Spice Bar Cookies page I created for my recipe collection. This page has been well loved over the years. You can see some of my later notes. I also added a lemon sauce to the recipe.

Apple Spice Bar Cookies Original Recipe

My mother taught me one of the best baking tricks: If you want raisins to be plump and soft in your cookie and cake recipes, simmer them on the stove for a few minutes before adding them to your recipe. Measure out the raisins first then place them in a saucepan. Cover the raisins with water (1 to 2 cups). Then place them on medium heat until they almost boil. Simmer for several minutes until the raisins soften up. Drain the raisins and then let them cool. Stir them in the colander a few times to help the raisins cool faster and release extra water.

If you add boiling hot raisins to your recipe directly, the eggs will curdle. Also, you can use some of the leftover raisin water in your recipes in place of other types of liquids. I don’t use the raisin water in this particular recipe, but with some experimenting you could probably replace some or all of the milk.

Apple Spice Bar Cookies Recipe

Apple Spice Bar Cookies (Or Apple Spice Cake) with Warmed Lemon Sauce

¼ cup shortening
1/3 cup sugar
1 egg
½ cup molasses
2 cups flour
1 ½ tsp baking powder
¼ tsp baking soda
1 tsp cinnamon
1 tsp nutmeg
½ cup milk
1 cup simmered raisins, (drained and cooled)
2 cups diced apple

1. Simmer the raisins on the stove, then drain and cool. Also peel and dice the apples. Set aside.

2. Cream together the shortening and sugar until light and fluffy.

3. Add the egg and molasses.

4. Sift together the dry ingredients. Add to the batter alternating with the milk.

5. Add the raisins and apple and carefully stir.

6. Pour into a greased 10×15 pan for apple spice bar cookies or 9×12 pan for apple spice cake.

7. Bake at 350 degrees for approximately 25 minutes. (Insert a knife or toothpick in the middle to test. It should come out clean of batter).

8. When cool, cut into bars and serve with warmed lemon sauce or lemon yogurt.

Lemon Sauce

1 ½ T. cornstarch
¾ cup sugar
½ tsp salt
½ cup cold water
½ cup hot water
½ lemon, juice and zest
2 T. butter

1. In a saucepan, blend cornstarch, sugar, and salt until no lumps.

2. Slowly add the cold and hot water while cooking over medium-low heat, stirring regularly to dissolve the dry ingrdients.

3.Cook 10 minutes, then add the lemon juice and zest and the butter. Stir well.

4. Drizzle over the Apple Spice Bar Cookies (Or Apple Spice Cake).

We hope these Apple Spice Bar Cookies become a delicious Fall tradition in your house! Enjoy!

Check out more delicious recipes here!

Apple Spice Bar Cookies Recipe

Share this:

  • Click to share on Facebook (Opens in new window)
  • Click to share on Twitter (Opens in new window)
  • Click to share on Pinterest (Opens in new window)
  • Click to share on LinkedIn (Opens in new window)

Filed Under: Cooking, DIY Tagged With: Christmas, Cooking, Fall, Holidays, Recipes

Battleship USS Wisconsin BB-64: Touring an Iowa Class U.S. Navy Ship

July 4, 2018 by BravelyBohemian

Here in the U.S., we have such a rich military history. We are so fortunate to have many military museums across the country that document history while preserving military artifacts. I recently toured the Battleship USS Wisconsin (BB-64), which sits in the harbor of Norfolk, VA and is part of the fantastic Nauticus maritime museum. This massive ship and its various crews served in three wars and was an absolute mechanical engineering marvel for its time. It was a very humbling experience to be on the battleship. I encourage you to take the time to visit the USS Wisconsin or one of its sister Iowa class battleships in your travels.

Battleship USS Wisconsin BB-64
About to board the USS Wisconsin at the Nauticus Museum in Norfolk, VA.

The USS Wisconsin is one of four Iowa class battleships that were built during World War II. Six battleships of this size and design were ordered by the U.S. Navy to be built during World War II, but luckily the war ended before the last two were completed.

All four of the Iowa class battleships are decommissioned by the Navy and are open to the public for tours. Here are their locations and links to learn more:

*USS Iowa (BB-61) is in Los Angeles, CA at the Battleship Iowa Museum and Pacific Battleship Center.

*USS New Jersey (BB-62) is in Camden, NJ, across the river from Philadelphia, at the Battleship New Jersey Museum and Memorial.

*USS Missouri (BB-63) is in Pearl Harbor, HI at the Battleship Missouri Memorial.

*USS Wisconsin (BB-64) is in Norfolk, VA at the Nauticus Featuring the Battleship Wisconsin.

The USS Illinois and USS Kentucky were the other two Iowa class battleships that were begun but never completed due to the end of World War II. Their hulls were later scrapped in 1958.

History of the USS Wisconsin and Sister Iowa Class Battleships

USS Wisconsin Iowa class battleship
View of USS Wisconsin BB-64 battleship in Norfolk, VA.

So what was the big deal about the Iowa class battleships, including the USS Wisconsin?

According to Randall S. Shoker, who wrote the museum guidebook for the USS Wisconsin, by late 1937, the U.S. Navy caught wind that the Imperial Japanese Navy was building three super battleships. These battleships were estimated to be larger and more powerful than any ship in the US Navy fleet or even scheduled to be built.

Per the Second London Naval Treaty of 1936, the U.S, France and Great Britain requested that Japan not build any military ships over 35,000 tons. It became evident that the Imperial Japanese government was disregarding the treaty. As a result, the U.S. Navy went to work developing plans and designs for the 45,000 ton, 16-inch gun Iowa class battleships.

USS-Wisconsin_16 inch guns_forward deck
Close-up of three 16 inch gun bases gracing the deck of the USS Wisconsin.

The main purpose of the Iowa class battleships, including the USS Wisconsin, was to provide escort and protection to the aircraft carriers and smaller ships that made up the U.S. Navy presence in the Pacific Theater during World War II. As you step on board the USS Wisconsin or one of its sister ships, you will quickly realize these battleships were not to be messed with! These ships are massive, as are the guns gracing its deck. Even the anchors and anchor lines are huge.

USS Wisconsin_Bow of boat_anchor chains
View of the USS Wisconsin standing near the bow of the boat. Note the two huge anchor chains.

What is really interesting about the USS Wisconsin, was that it was commissioned for World War II, then decommissioned, reactivated for the Korean War, decommissioned again, then reactivated for Operation Desert Storm in 1991, with its final decommissioning in 2006. The strength of the ship and its immense firing power from its 16-inch guns, were still useful almost 30 years later after the ship was built. We had a friend who served on the USS Wisconsin in Operation Desert Storm who said there was nothing like those huge guns going off! The guns have a 23 nautical mile range.

Touring the USS Wisconsin and Sister Ships

USS Wisconsin_Battleship_Tour_sign
Welcome sign for USS Wisconsin battleship tour.

Each of the battleships offers self-guided tours as well as VIP scheduled tours. I highly recommend taking at least one of the VIP scheduled tours. They are totally worth the extra cost. Often led by retired US Navy Veterans, you will learn a ton not only about the ship but also about how people lived and worked on the ship. And the veterans are full of stories from their own naval experiences. They also share stories from people who served on the ship and who have come back as civilians to share their own memories.

Top of USS Wisconsin_Radar_Equipment
The USS Wisconsin and other Iowa class battleships were updated in the 1980s to have modern radar and missile systems.

On the USS Wisconsin, I toured the main sections of the battleship first. Most people do this by following the self-guided ship map and signs. I was fortunate to be part of a private tour group and event fundraiser, which inspired me to come back to do additional tours. You can wander around the main deck, and then go below to see everything from the ship’s chapel and dental clinic, to the enlisted men’s living quarters, offices, machine shop and mess hall.

Throughout the ship, you will see military posters and bits of artwork graffiti adorning the walls created by various sailors throughout the years. Wandering around the ship really gives you an idea of how big the USS Wisconsin is, yet how cramped it must have been when operating with a full crew.

16 inch guns_USS Wisconsin
Note how large the 16 inch guns are in comparison to the students standing by them.

Guided Command and Control Tour

Conning Deck view toward Bow on USS Wisconsin
View from the Conning Deck of the USS Wisconsin facing the bow of the battleship and downtown Norfolk, VA.

Next, I took the VIP Guided Command and Control tour. This included climbing up and down four stories of the ship on original, really narrow metal ladders. Be sure to wear comfortable shoes. You will also be walking over grates, climbing through hatches and trying not to bump into things. Your legs may or may not forgive you after this ship-wide adventure!

USS Wisconsin_Machine_shop
The USS Wisconsin was almost completely self-sufficient while out to sea. If any gears or equipment broke, new ones could be built in the Machine Shop.

The tour takes you through officer quarters, including that of the Admiral and Captain, which are interesting to compare to the cramped quarters of the enlisted men. You will be impressed by the Combat Engagement Center. This is where the action of the ship was plotted, planned and acted upon. While the room is filled with part World War II and Korean War components, the space was also updated with modern equipment such as computers and radar in the mid-1980s. You will listen to an impressive “live” combat situation while parts of the room light up to help you understand who makes decisions when and how an operation would proceed.

USS Wisconsin Iowa class battleship Combat Engagement room
Combat Engagement Center on the USS Wisconsin with 1991 state of the art radar and missile control technology.

Next, you will then be taken up to the bridge and conning tower, where there is an amazing view over the front of the ship. The flag bridge was where the captain often spent his time. Then the pilot tower sits on the deck above the flag bridge. I also enjoyed seeing the central part of the pilot tower, known as the armored conning tower. The conning tower is the chamber from which the ship was actually steered. Three sailors were literally locked into the room for the duration of their shifts. The room was circular and reinforced by over 17 inches of steel. The idea was that the room could withstand bomb impacts from enemy fire, so the sailors could keep navigating the ship regardless of what else was happening elsewhere on the ship.

USS Wisconsin Navigation Room Iowa class battleships
Navigation Room: Sailors were trained in both high tech and traditional navigation techniques.

Finally, the tour concludes with a visit to the areas where Operation Desert Storm era Tomahawk missiles once inhabited the ship. The Wisconsin held eight box launchers on one of its upper decks. These boxes contained a total of 32 Tomahawk cruise missiles. These missiles worked on a precision system and could hit a target up to 675 miles away. Some of the box launchers and the tracks they worked on are still intact on the ship.

Tomahawk missile launch box_USS_Wisconsin_1991_Desert_Storm
An example of a Tomahawk missile launch box used in 1991 Desert Storm on the deck of the USS Wisconsin.

Guided Engine Room Tour

Steam system diagram_USS Wisconsin_engineering
This diagram shows the engineering behind the four identical steam systems that drove the USS Wisconsin forward.

The next tour I took was into the bowels of the USS Wisconsin on the Guided Engine Room Tour. I know very little about electrical and mechanics, but all I could think during this tour, was Wow! What an amazing feat of engineering. The Iowa class battleships were built to be sleek and fast. The ships operated on steam and could cruise through the water at up to 33 knots. They also held so much gasoline (over 2.5 million gallons of fuel) that they could refuel smaller ships in the Navy fleet while at sea. This was a huge advantage at the time.

The USS Wisconsin and other Iowa class battleships were fast because they were operated by 4 identical competing boiler systems. Each fire room contained 2 oil-burning boilers, a total of 8. The boilers were manually managed, creating steam to power the ship. The ship was then managed and driven forward by 4 massive propellers.

Our guide shared a 3-D video with us in one of the fire rooms, where a sailor takes you through the process he uses to light the boiler and then monitor its heat and steam production. Depending on commands from other parts of the ship, such as how fast to sail, sailors in the engine rooms would manually adjust the boilers and steam production. If it was “Full sail ahead!” our guide said the four-engine room teams would often compete with each other to see how fast and accurately they could get their part of the ship operating.

USS-Wisconsin_Fire_Room_Boiler
An example of a lit boiler in one of four Fire Rooms aboard the USS Wisconsin.

The Engine Room tour was fascinating. Once again, get ready to traipse all over the ship, mostly climbing to the lower decks. Everywhere you turn there are electrical lines, pipes, valves, and gears. You will wander through “Broadway” the main corridors that run the length of the ship on both sides.

USS_Wisconsin_Broadway_running length of ship
“Broadway” ran the length of both sides of the USS Wisconsin. Note all the chamber doors that could be closed during combat operations.

Also, you will visit the Machine Shop, where any valve or part for the ship that breaks could be recreated onsite. Then, you will then scoot down some very steep ladders and across grates to see the boilers, walls of fire room gauges, turbo generators, steam turbines and the propeller shafts. Again, you will have that feeling like you are going to bump your head on beams or back into gauges or pipes. It is a true reality check when you think that during its lifetime, up to 2,800 men lived and worked on the USS Wisconsin at any given time!

USS Wisconsin_Engine_Room_Gauges
Manually monitored gauges in one of the four engine rooms on the USS Wisconsin.

While someone who studied engineering or electricity will really enjoy the details of what they are looking at, the USS Wisconsin Engine Room tour is still very eye-opening. The equipment to run the Iowa class ships was massive! You walk away imagining how hard (and hot!) the work was for sailors to run these ships 24/7. And I am thoroughly amazed that the USS Wisconsin was used in Operation Desert Storm in 1991. While it had many upgrades in its radar, missile defense and electronic systems up top, the reality was the manual engine operations propelling the boat were much the same as they were in World War II and the Korean War.

USS-Wisconsin_example_gears_valves_Mechanical_engineering
The USS Wisconsin and sister Iowa class battleships were true feats of mechanical engineering. This is an example of typical gears and valves used to manage the ship.

I encourage you to visit the USS Wisconsin at the Nauticus museum in Norfolk, VA and its sister Iowa class battleships in New Jersey, Los Angeles, and Hawaii. As one middle school student from Ontario, Canada who I happened to meet while standing at the bow of the boat looking back at the whole of the ship, exclaimed, “This is AWESOME!” I had to laugh at his enthusiasm, (He’s a future engineer, for sure!), but also had to agree setting foot on the USS Wisconsin is an impressive experience.

Happy Adventuring!

Love military history? You may also like this travel review on the National D-Day Memorial in Bedford, VA.


Share this:

  • Click to share on Facebook (Opens in new window)
  • Click to share on Twitter (Opens in new window)
  • Click to share on Pinterest (Opens in new window)
  • Click to share on LinkedIn (Opens in new window)

Filed Under: Adventuring, History Tagged With: Adventuring, History, Museums, Travel, World War II

Make a Trendy Boho Tray with Tassel Trim

June 7, 2018 by BravelyBohemian

I love to decorate our home with unique, eclectic items from around the world. I especially like bohemian functional décor. Check out this boho tray I just made that uses turquoise wood stain, batik fabrics, silver faux leather handles and handmade tassels. Full directions are below!

Boho DIY Tray with Tassels

What You’ll Need:

Wood Picture Frame Tray (with Removable Backing) OR
Unfinished Wood Tray and Custom Glass Inset
Sandpaper
Paint or Colored Wood Stain
Clear Varnish
Up to 12 Different Cotton Batik Fabric Quarters
Scrap Paper or Tissue Paper for Pattern
Thread and Metallic Thread
Clear Caulk Sealant
2 Reels Faux Leather Cording
Glue Gun
4 Large Jewelry Clasps
8 Large Hole Silver Beads


I am a sucker for picking up amazing fabrics, though I have never been a quilter. Cotton batiks are one of my favorites. I love the random patterns and organic melding of colors in these dyed fabrics.

Batik Fabric Quarters_Boho Tray Project

Boho Tray Directions:

Start by lightly sanding the wood tray, wiping it down with a damp cloth, then staining it with the colored wood stain. I found the unfinished tray and wood stain at Michaels or you can order the stain from Amazon. I used the Plaid Folkart Ultra Dye, which comes in numerous fun, vibrant colors. I chose the turquoise shade which goes with the décor on our back screen porch.

You may want to add several layers of stain to your tray. It gets slightly darker each time you stain. You can also lightly sand in between coats to keep the wood tray smooth.

Turquoise stained Boho Tray

You can also choose to paint your tray instead of staining it. My tray was unfinished wood to begin with. However, painting might be easier if you are upcycling a photo tray.

Next I added 2 layers of clear varnish to the tray to seal in the wood stain and help protect the tray from wear and tear. Places like Lowe’s and Home Depot have additional varnish choices if you want to add a glossy, polished look to your wood.

The inner part my boho tray is a slightly odd size, so I had to cut glass to fit. I tried a few times to cut my own but decided after a few breaks to spend the $10 to have the professional at our local frame shop cut the glass for me. Set the glass aside. We will install it after the fabric part is inlaid into the tray.

***Note: If you cut your own or you have the glass custom cut for you, the edges are EXTREMELY sharp, so handle with care so you don’t cut yourself. ***

Calculating size of fabric squares for boho tray

Now you are ready to play with the batik fabrics that will line the inner part of your boho tray. Measure the interior of your tray and decide how you want your fabrics laid out. I decided to use 12 different batik squares in coordinating and contrasting colors. I used scrap paper to make a pattern and adjust the size of the squares to fit the space in the tray. For my tray, I cut 4-inch squares that included ¼ inch seam allowance on each side. So the final size of the completed squares, when sewn together, would be about 3 ½ inches each.

Add seam allowance to boho tray fabric squares

Next, use your pattern with seam allowance added to cut out your squares. Stitch them together, right side of fabrics together, joining them into a grid.

Once the squares are sewn together, iron all of the seam allowances flat. Then using a half cotton poly/half-metallic thread mix, top stitch your squares. On my fabric squares, I used black and silver metallic thread in a large machine zigzag stitch.

***Note: You can also use completely metallic thread. However, it can be finicky, so you may need to use a special needle in your sewing machine. Also, practice on scrap material. Here are some good tips for working with metallic thread.***

Iron once more and then you are ready to slide the batik fabric squares into the tray. I then carefully set the glass on top. If your fabric is sticking up on the sides beyond the height of the glass, carefully trim it. I had to take about 1/8 of an inch off the edges all the way around.

Boho Tray with batik fabric and glass insert

Once you have the fabric and glass in place, carefully seal the edges of the glass insert with clear silicone sealant. This will protect your fabric from dirt and water when you go to clean the tray, plus will also seal in the sharp edges of the glass overlay.

faux silver leather wrap on boho tray handles

Next, wrap the handles of the tray in the faux leather trim. Practice how you want it to look and then use a glue gun or jewelry glue to affix the trim. (It may or may not help to have a cat participate in this step).

Cat Helps with Art Project_Boho Tray wrapped handles

I decided to make tassels for the handles and attached them to the handles using large jewelry clasps. This allows them to be removed when cleaning the tray.

Closeup of removable tassels and faux leather handle wraps on boho tray

My tassels are made out of batik fabric scraps that are cut, rolled and held together by wide mouth silver beads. Here’s how to make the tassels:

Boho Batik Tassels:

Cut a desired length of batik.

Select and prep fabric to make tassels

On one half of the fabric’s length, make vertical cuts most of the way toward the middle of the fabric, 1/8 to ¼ inches wide. Continue until the end.

Turn the fabric and do the same to the other length so that each side of your fabric becomes fringed.

Fold the fabric in half, wrong sides together, right sides out. Roll the fabric into a fringed tube.

Rolling fabric into tassel for boho tray

Secure with the silver wide mouth bead.

completed fabric tassel for boho tray

Use your metallic thread and stitch through the top of the tassel above the bead, then loop through the jewelry clasp and knot the thread several times. Trim thread. Make your loops different lengths to give your tassels a cascade look. Afix to the handles of your tray.

Enjoy decorating and entertaining with your new boho tray! Your tray will make a great centerpiece when you throw your next bohemian themed party (with or without cats).

Inspired by this project? Check out more great bohemian DIY projects here. Happy Boho Crafting!

Final look at Boho Tray with glass and batik fabric inlay


Share this:

  • Click to share on Facebook (Opens in new window)
  • Click to share on Twitter (Opens in new window)
  • Click to share on Pinterest (Opens in new window)
  • Click to share on LinkedIn (Opens in new window)

Filed Under: Crafting, DIY, Home Decorating Tagged With: Crafting, DIY, Home Decor

A Ghost Photography Book Review: The Apparitionists: A Tale of Phantoms, Fraud, Photography, and the Man Who Captured Lincoln’s Ghost

April 4, 2018 by BravelyBohemian

If you ever peruse Victorian photographs on Pinterest or the web, you probably have stumbled across one of the most famous pictures of ghost photography- Mary Todd Lincoln being consoled by the ghost of her husband, Abraham Lincoln. The picture is creepy, yet somehow draws you in. It is a photo of mourning, yet comfort at the same time. The photo has a universal quality to it. Don’t we all want to know that our passed loved ones are still near and watching over us, even to this day?

Lincoln's Ghost_Photograph of Widowed Mary Todd Lincoln
Mary Todd Lincoln being consoled by the spirit of Abraham Lincoln in famous ghost photograph by William H. Mumler. From the collections of Allen County Public Library, Fort Wayne, Indiana

The ghost photograph of the Lincolns was taken by William H. Mumler around 1869. Mumler was an early dabbler in the art and science of photography just as the invention arrived in the United States from Europe. The new book, The Apparitionists: A Tale of Phantoms, Fraud, Photography, and the Man Who Captured Lincoln’s Ghost by Peter Manseau takes us on a fascinating journey through the 1850s to just after the Civil War when photography becomes all the rage in the United States.

The Apparitionists: A Tale of Phantoms, Fraud, Photography, and the Man Who Captured Lincoln’s Ghost

For the first time, people could capture and preserve- in the moment- images of their loved ones and hold them close even after that person passed away. Until that time, people of means maybe had a painted portrait or two created during their lifetime. For most people, images of their loved ones simply faded away with memories.

Photography, especially in the early years, was certainly a grand science experiment. First, the desired image needed to be captured on plates, then developed with a series of chemicals, followed by the printing of the image. The process was often dangerous, depending on the chemicals used, and time-consuming. In the early days, people had to sit without moving for several minutes so that there was enough time for the exposure to take place. Preparation of the camera plates and development of the photos also left lots of room for human error.

Whether he meant to be or not, William H. Mumler became one of the most famous and sought-after photographers of his time. Mumler appeared to have a gift- he caught spirit images in his photographs. How he did it, he never revealed. But most likely, he manipulated his camera plates and chemicals to expose such images into his portraits.

With such massive loss of life during the Civil War, coupled with the affordability of photography during the 1860s – almost every soldier had a photo taken of himself in uniform before heading off to war to leave with loved ones- people turned to photography to help them grieve. And Mumler one-upped this by capturing the spirits of those loved ones they were grieving.

In The Apparitionists: A Tale of Phantoms, Fraud, Photography, and the Man Who Captured Lincoln’s Ghost, Manseau explores the role of the Spiritualism Movement in America, which also helps explain people’s obsession with ghost photography. As we recently explored in the post about the Erie Canal, Spiritualism started in Upstate New York. People wanted to know their passed loved ones were still close and helping to guide their lives. Contacting the dead through mediums and séances became all the rage. Many of these activities were acts of showmanship and sleight of hand, but people didn’t care. They desperately wanted beliefs to hold onto. Spirit photography easily found its place among such believers.

Yet many people set out to prove Spiritualism practices such as Mumler’s ghost photography as fraud. Numerous people, including competitor photographers, came to Mumler’s studio to try and spot his manipulations. Articles for and against ghost photography were written about in popular magazines of the day.

William Mumler Trial_Harper's Weekly_May 6_1869
The front cover of the widely read Harper’s Weekly from May 8, 1869 describing the Spirit Photography trial of William Mumler in detail.

All of this activity came to a head in 1869, when William Mumler gets charged with fraud and finds himself in the center of a lengthy and expensive court case. Most of the case was dramatically published in Harper’s Weekly. Manseau walks the reader through many of the transcripts of the trial. The trial takes numerous turns as witnesses argue not just whether William Mumler is guilty of fraud but whether ghosts are real and Spiritualism, in general, is reputable. Even P.T. Barnum, the ultimate showman of the time, steps in as a witness.

While a trial like William Mumler’s would certainly be thrown out of today’s courts, in 1869, the case received national attention. It is a curious look at how the court was conducted in Victorian America and leaves a lot to be desired.

I will leave the rest of the whodunnit and how, plus the outcome of the trial for you to find out when you read the book. The Apparitionists: A Tale of Phantoms, Fraud, Photography, and the Man Who Captured Lincoln’s Ghost is an incredibly interesting read well worth your time.


Share this:

  • Click to share on Facebook (Opens in new window)
  • Click to share on Twitter (Opens in new window)
  • Click to share on Pinterest (Opens in new window)
  • Click to share on LinkedIn (Opens in new window)

Filed Under: Books, History, Reviews, Spirit Tagged With: Books, History, Reviews, Spirit

  • « Previous Page
  • 1
  • 2
  • 3
  • 4
  • 5
  • …
  • 10
  • Next Page »

Meet Karen…

https://www.bravelybohemian.com/meet-karen
Wife, Crazy Cat Lady, Museum Junkie, History Buff, Entrepreneur, Crafter, Collector, Book Enthusiast, Project Runway Addict, Holistic Gypsy, Adventurer, Steampunker, Literal Tree Hugger and All-Around Fun Gal

Disclosure: This blog uses affiliate links, meaning we earn a small compensation when you purchase from our links. Your purchase helps keep the blog running, plus the cats fed and off the desk long enough to deliver you new content.

Get Bravely Bohemian!

Never miss a new post or opportunity to be more Bravely Bohemian!! We’ll even send you some FREE Boho goodies! Subcribe Here:

Connect with Us!

  • View BravelyBohemian’s profile on Facebook
  • View BravelyBohemian’s profile on Twitter
  • View BravelyBohemian’s profile on Pinterest
  • View karen-mcmahon-4a92a411b’s profile on LinkedIn

Trending Boho Topics

Shop Our Favorite Brands:

10% off at World Market with code SAVEBIG10
CLICK.BUY. CREATE. Shop Michaels.com today!
Gaiam Meditation Banner
Plow & Hearth
Women Shoes $50-$7,$100-$20,$150-$35; Coupon code:wsnc7; Coupon code:wsnc20; Coupon code:wsnc35; Expire on:4/30/2019

Copyright © 2023 · Lifestyle Pro Theme on Genesis Framework · WordPress · Log in


Loading Comments...